Never to old …

I learned something interesting this week … wax is being used during the 3D-printing process. You might wonder how I found out … well that’s al quite simple. I decided to complete the first two printed wholestick trucks and added the corner posts to the trucks. After doing this, I applied the first layers of grey Tamiya primer and that’s when the trouble started …

Checking the proportions with Preiser figures (1:87) 
Unfortunately the primer started peeling of directly after it had been sprayed on. This was caused by the fact that 3d-printed parts are being supported by a wax structure during the printing itself. Most of it is cleaned of afterwards, except for a thin layer …
The 3D-printing service informed me that it would be best to clean the parts with acetone, before applying the paint. Hope the printed parts will stand a nice bath of Airbrush Cleaner first …

Weico Models

To my big surprise, I stumbled upon a couple of 1:87 models of Aussie cars at a European Model Railway exhibition this weekend. These little white metal gems have been manufactured by Weico Models in Victoria.

Three Holdens made by Weico Models

Although they do not fit the era of my layout, which will be situated in the mid 1930s, I could not resist buying them … one never knows if they will come in handy at a later date!
For those who have never seen these cars before, they’re Holdens … on the left is starts with a 1953 Holden FJ Panel Van, then a 1953 Holden FJ Sedan and on the right the most Australian one of them all – a 1958 Holden FC Ute.

Wow, that’s quick …

About nine days ago I place my second order of 3D-printed parts at Printapart.com and it just arrived this afternoon … wow, that’s really quick and what a great service.
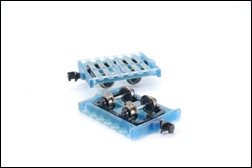
The order consists of two wholestick trucks, that have been based on the models made by Greg Stephenson. I still needed to add more details like a winch and the nuts & bolts, but ordered a couple of them already to see if they would fit the little Roco chassis.

3D-Printed wholestick trucks
As you can see from the picture above and the ones at the end of this post, it is a perfect fit. It simply slides on without having to cut-off any parts and it does not require any glue. Furthermore, I have added four holes for the vertical corner posts, which can be made of  square (1×1 mm) brass or styrene.

Continue reading

It finally arrived!

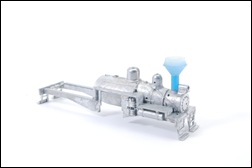
Two weeks ago, I modelled and ordered the diamond shaped smoke stack for my Shay. After some delay due to the eruption of an Icelandic volcano, it finally arrived today.
I must say that I am very pleased about the result and the picture below does not really do it justice.

The Diamond Stack from Printapart.com

The material at the top of the of the smoke stack is quite thin (about 0.25 mm) and due to the fact that the 3D-printing material is translucent, the quality of the part is not fully visible in the picture … probably best to spray it with some Tamiya primer on of these days and to shoot another picture.
I however believe that I have found a great method to model an HOn30 “Class A” Shay and will proceed to model more parts for this model the coming months!

Britannia Creek

The Icelandic volcano fallout unfortunately delayed the delivery of the printed parts from the United States, as the airspace above most of Northern Europe had been closed down.
It however gave me some time to look for more information about the narrow gauge tramways in Australia.
I found another “creek” layout … but this one has a different scale (On30) and is called Brittania Creek. It is freelanced log tramway that is set in the late 1950s.

Brittania Creek Reight Depot
The blog shows some great scenery and kitbashing examples, like the freight depot shown in the picture above. It’s a Rusty Stumps model that has been “Australinised” by using corrugated iron instead of shingles. Definitely something I could do myself with an HOn30 kit …